

Last updated on May 27th, 2022
Important Terms & Concepts
SKUs (Products/Services)
A Stock Keeping Unit (SKU) is a unique numeric or alphanumeric id assigned to a product or service to surely and rapidly identify all its features as its product name, price, attributes, brand, quantity on hand, etc. An SKU is used to track inventory and can be assigned manually or by the inventory system itself.
Tip: WooPOS uses an SKU as a unique identifier to link your products to your online web store (WooCommerce, Shopify, Squarespace). SKUs in WooPOS are identical to the SKUs on your web store.
For a product with variants like a T-shirt with different colours and sizes as variation attributes, you can create Variation SKU. In that case, the SKU identifies the style (set of variants) of the product and the Variation SKU identifies not only the style but also its different variants composed of different attributes. Eg. a T-shirt style can be identified as TS_MESSI and if it comes in two attributes, which are colours (blue and red) and sizes (S, M), the MAIN SKU will be TS_MESSI and there will be 4 Variation SKUs generated by WooPOS as written below:
TS_MESSI-blue-S
TS_MESSI-blue-M
TS_MESSI-red-S
TS_MESSI-red-M
Product Number
A Product Number is normally your supplier/vendor’s own SKU number associated with each product that you order. The product numbers will be printed on purchase order reports. You can use product numbers during sales if the product number is unique in WooPOS. When a product number is scanned or searched, WooPOS will automatically look up the corresponding SKU for that product. WooPOS supports multiple vendors’ product numbers for the same SKU.
Lookup Code
A lookup code is an additional identifier, usually a barcode or number, from the manufacturer of a product that is unique to each product. You can use a lookup code during sales if the lookup code is unique in WooPOS. When a lookup code is scanned or searched, WooPOS will automatically look up the corresponding SKU for that product. You can add manufacturer UPCs or EANs as lookup codes in WooPOS.
Tip: When designing your own barcode using SKUs, if the SKU is too long to display on the barcode, WooPOS will automatically generate lookup codes to fit the barcode size when printing labels. The lookup code will replace the SKU on the barcode.
Barcode
A barcode is a square or rectangular image consisting of a series of parallel black lines and white spaces of varying widths that can be read by a scanner and interpreted as numbers. Barcodes are applied to products as a means of quick identification. They are used in retail stores as part of the purchase process, in warehouses to track inventory, and on invoices to assist in accounting, among many other uses.
Note: The most widely used barcode standards are UPC (Universal Product Code) and EAN (European Article Number) which are usually printed by the manufacturer on the product or packaging. When generating barcodes, WooPOS will print the SKU on the barcode using the CODE128 (or CODE39) standard by default. In some cases, if the SKU is too long to fit on the barcode, WooPOS will use or create a lookup code instead.
Transaction
A transaction takes place when a payment is made by a customer at a cash counter or on the web store in exchange for products or services. WooPOS stores and records all transactions from all locations and web store.
Customer
A customer is an individual or business that purchases another company’s goods or services. All transactions in WooPOS are associated with a customer. Where no customer information is available, the cashier must select the generic “Thank You” customer profile.
Vendor (Supplier)
A vendor is a party in the supply chain that makes goods and services available to companies or consumers. The term “vendor” is typically used to describe the entity that is paid for goods that are provided, rather than the manufacturer of the goods itself. However, it is possible for a vendor to operate as both a supplier (or seller) of goods and a manufacturer.
A vendor, also known as a supplier, is a person or a business entity that sells something. Large retail store chains such as Target, for example, generally have a list of vendors from which they purchase goods at wholesale prices that they then sell at retail prices to their customers.
Department (Category)
Within WooPOS a department is a way to group or classify inventory by any custom classification, for example, a baby toy can be classified under the “toys”, “children” or “babies” department. Think of a department as a category. WooPOS also allows nested departments, this means that each department can have sub-departments. In the example above, toys can be a child department of the “children” department.
Note: Each SKU must belong to at least one department. WooPOS creates a default “Miscellaneous” department for unclassified products.
Note: When connected to your web store, Departments in WooPOS are the same as Categories in your web store. When you add or edit a department in WooPOS the corresponding category for that product is modified on your web store.
Product Attributes
WooPOS uses the entity–attribute–value model (EAV) as a multi-dimensional inventory structure. It provides you with the flexible functionality to assign custom properties to each product in your inventory catalogue. Out-of-the-box WooPOS offers a few built-in defaults attributes to extend your SKUs. Examples of WooPOS default attributes are Description, Product Number, Department, Vendor, Brand, Season, etc. You have the powerful option to extend this capability in WooPOS. With products, for example, you can set up attributes for product colour, size, width, height, etc. Generally, any information that makes the product unique can be recorded and tracked using product attributes. The capacity for managing product attributes allows a proper definition of the products and assures compliance with the tracking requirements imposed by the majority of industries.
Depending on the type of data you wish to collect for each attribute, WooPOS gives you a selection of different field types to collect custom attribute data:
- Decimal
- Integer
- Check Box
- Text
- Date
- Select Box
- Multiline Text
- Image
- HTMLEditor
- File
Tip: Product attributes can be used not only to track the individual characteristics of a product but also as an additional tool for filtering, navigating and grouping inventory in your catalog.
Attribute Set
An Attribute Set is a set of related product attributes that fully describe all of a product’s characteristics. An attribute set can be assigned to a product each time it’s created. This lets you add all the important information about each different type of product in one step. Every attribute set is a combination of specific attributes that are related in some way. You can create an unlimited number of attribute sets.
Attribute Group
An Attribute Group is a collection of related attributes within an attribute set. For example, an attribute group named “Prices” can contain attributes related to a product’s pricing, such as “price”, “special prices”, “cost”, etc.
Tip: Leave the default attribute group name as “Default” if you do not need more than one attribute group in your attribute set.
Useful link: Understanding Attribute and Attribute Sets
Product Types
Simple SKU (Simple Products)
A simple product is the most common and simplest product type in WooPOS. It represents a unique, stand-alone unit of inventory that can be sold to a customer. You can add price, SKU, product number, lookup code, barcode and custom attribute to a simple product.
Variation SKU (Variable Products)
Variable Products are also known as Variation SKUs in WooPOS are a product type that lets you sell products that have variations, with control over each of the product’s attributes such as size, prices, stock, image and more. For example, When selling a product like a shirt, you can offer it in different sizes like large, medium and small and in different colours. Each combination of different attributes offered as part of that product’s options is a variation.
Useful link: Variation SKUs
Grouped Product
A product group lets you group SKUs together using the group name attribute, you will need to enter a group name in the group field under the SKU Info tab for each SKU. As soon as more than one SKU has the same group name assigned, then they will automatically be assigned to that group. Each time a grouped SKU is selected, you can use the Inventory Items & Lookups tab to view other SKUs within the same group.
Note: product groups are not automatically sold together. the grouping functionality allows you to look up other products within a group and then add them to your order, should you wish.
Tip: This can be useful when you want to suggest other items that are in stock, of different quality, etc to a customer. In that situation, you can add multiple items of the same kind to a group and then quickly access different SKUs in that same group to compare or sell.
Useful link: Grouping SKUs Together
Bundle Product
A bundle product or bundle SKU in WooPOS is a virtual “basket” product which does not have any stock management (you can not track or store its own quantity on hand). Instead, you can add other products to a product bundle and each time the bundle is purchased WooPOS will subtract the quantity of all the SKUs sold together in that bundle as if held together in a virtual bundle. You can set them up from the Products/SKUs window.
Useful link: Creating a Bundle SKU
Assembled SKUs
An assembled(kit) SKU is a grouped product that contains sub-products or sub-SKUs sold together in one separate SKU. Every time an “assembly” is built, the Quantity On Hand (QOH) of the sub-items will be adjusted to reflect their inclusion in the assembly item.
Useful link: Creating an Assembled SKU
Rental
A rental product in WooPOS is a product type that lets you rent-out units of time associated with an SKU either as a service or as a product. This product type has useful attributes and tools that allow you to handle rental specific functions like deposits, bookings, reservations, grace periods, minimum rental times, buffer rental times, calendar view, sign in and sign out etc.
Useful link: Rental Reservation Setup
Trade-In Product
A trade-in SKU allows you to take an item from a customer into your inventory while paying them for it at the same time. The item will be created automatically as an SKU in your inventory, with a description and price.
Useful link: Trade-In SKU
Partial Quantities
Partial Quantities allow you to sell an SKU in sub-units. For example, you can set up partial quantity if you’re selling meat by kilogram and wish to sell it per gram as well. In WooPOS any product can have partial quantities setup.
Note: Partial Quantities can only be applied to an SKU that has Partial Qty enabled and a Unit Type selected under the General Settings tab in the Settings section of WooPOS
Packaged SKU
Packaged SKUs enable you to sell an item both as a package and individually as well, (for example, a bottle of whiskey can either be sold by the bottle or by the case).
Note: A Packaged SKU does not allow you to sell subunits as custom fractional quantities of the parent SKU. For instance, in the example above, if you wish to sell each bottle of whiskey by the shot, you will need to set up partial quantities instead.
Useful link: Selling an Item Individually and by Package
Multi-locations/Warehousing
Creating In-Store locations (Batch/Lot/Bin/Section)
Each location can have in-store locations in the form of batches, lots, bins or sections. In WooPOS in-store locations can be managed through custom attributes. It is important to decide how you wish to use your in-store locations ahead of time. Instore locations can be used to represent physical in-store locations or virtual product collections. One way a batch can be used, for example, is to track expiry dates for inventory like food items or medicine. Alternatively, sections may represent a physical in-store location like the storeroom within a location to help track inventory in an easier way. In any case, batches/lots/bins/sections are interchangeable within WooPOS.
Tip: To improve your count accuracy it is recommended that you divide your inventory count into physical sections called batches. They will represent for example Front Window (batch 1), Left Retail Wall (batch 2), etc. This is to identify where each product was counted to help in the correction process in case of any discount. Use the box in the left corner labelled “Batches” to enter your batch ID (each batch is numbered) and hit the Create Batch button to create your batch.
Useful link: Creating Batches
Useful link: In-Store Location (Batch/Lot/Bin) Inventory Management
Transferring Inventory Between In-Store Locations
You can move inventory between in-store locations. For example, if you have an in-store location setup for a storeroom and another one for the store. You can easily transfer inventory between your storeroom and store.
Useful link: Transferring Inventory Between In-Store Locations
Creating store/warehouse locations
Each operating entity in WooPOS that shares the same inventory and devices is a location. While a location usually represents a store, it can also represent a warehouse or a website e-commerce store. Depending on the WooPOS plan you are on, a business can have multiple locations.
Transferring inventory between store/warehouse locations
Retailers often find that some of their stores are completely sold out on one particular SKU, while the same SKU is in abundance in other stores. Inventory balancing is a great way to clean shelves from the slow-moving merchandise, boost inventory turnover and sales avoiding unnecessary discounts. WooCommerce POS offers powerful WooCommerce inventory management that enables you to track, maintain, and view stock levels across multiple stores in real-time. Move stock between stores or your warehouse with stock transfers, and quickly perform inventory lookups across all your sales channels.
Useful link: Transferring an Item to Another Store
Importing products from Spreadsheet
Importing products from a spreadsheet (Excel or CSV)
In WooPOS you can import inventory from any spreadsheet software like Excel or Google Sheets as a CSV. Importing inventory via CSV enables you to import several SKU attributes including variations, product images, price, quantity on hand etc.
Useful link: Importing Product SKU List From Excel or CSV
Useful link: Importing UPC/Lookup codes with Excel
Useful link: Importing Serial Numbers
Useful link: Importing Minimum/Maximum ReOrderPoint
Importing Vendors from a spreadsheet (Excel or CSV)
In WooPOS you can import inventory from any spreadsheet software like Excel or Google Sheets as a CSV. Importing inventory via CSV enables you to import several SKU attributes including variations, product images, price, quantity on hand etc.
Useful link: Importing a Vendor List With Excel
Useful link: Importing SKU Alternate Vendors with Excel
Useful link: Importing Vendor Contacts
Updating products from Spreadsheet
You can bulk update SKU by exporting your products to Excel, and then editing the information and importing it back into WooPOS.
Useful Link: Updating Your Products Information Through Excel
Updating Webstore products from Spreadsheet
When handling a large number of products it sometimes becomes necessary to edit those products in one go. It’s not always practical or efficient to edit products one at a time. WooPOS allows you to bulk edit products in a spreadsheet or CSV (Excel/Google Sheets) by first exporting all products to a spreadsheet file, editing it and then re-uploading all the changes back into WooPOS which then pushes those changes directly to your Webstore.
Exporting and Importing Web Attributes
Additional information that is added to your products on your website, for example, image thumbnails, custom data added by plugins and web-specific product options, are often stored in the form of product attributes, in WooPOS these are referred to as webatts (web attributes). WooPOS gives you an option to update web attributes on your web store directly from a spreadsheet file.
Useful link: Exporting and Importing Web Attributes
Useful link: Importing Images and Attributes with Excel
To publish/upload web attributes to web, enable switch 086 in-store settings. Then publish products to WooCommerce. With switch 086 on, WooPOS will upload the web attributes stored in WooPOS to WooCommerce. Otherwise, WooPOS will always download web attributes from WooCommerce each time before uploading.
Inventory Receiving
Receiving is the process by which businesses track which items on a purchase order arrived in a delivery. Someone, such as a receiving clerk, will physically count the merchandise as soon as it arrives to verify the quantity and type of product received. You’ll use WooPOS to track goods received and match them to the purchase orders and invoices. This ensures that your company receives everything you ordered and provides you with the documentation you need to request vendor credits for missing or damaged merchandise.
Purchase Orders
A purchase order (PO) is a legal document that your business sends to your suppliers to document the sale of products and services to be delivered at a late date. This allows your business to place orders with your suppliers without immediately making payment. Suppliers use POs as a way to offer buyers credit without risk because the buyer is legally obligated to pay for products and services when they’ve been delivered. Once accepted by your supplier, a purchase order becomes a legally binding contract. If there is not an existing contract that governs the relationship between you and your seller, the purchase order can take its place. This offers legal protection for both buyer and seller.
Tip: In WooPOS a Purchase Order can be used internally without sending it to your suppliers. For example, In order to receive inventory against a supplier’s receipt for an order already paid for, you can first create a Purchase Order that matches that receipt and then receive the inventory in WooPOS.
Useful link: Purchase Order Guide
Order by Package
Most retailers will buy inventory by the pack and sell it individually by unit. What this usually means is that in WooPOS the product will be entered as a single unit, but when ordering from suppliers it will be sold exclusively by the pack. WooPOS lets you order inventory by the pack that you can sell in your store by the unit. For example, if you sell loaves of bread as single units, WooPOS allows you to order them by the dozen in your Purchase order.
Useful link: Selling and Ordering By Package
Order Bundled/Assembled Products from Supplier
In the process of a purchase order, you may wind up ordering a selection of items which your vendor sells to you as a packaged unit. An example of this may be candles of different sizes which you intend to sell at different prices, though your vendor sells them to you together packaged at a set price. For your business, you may not want to sell the candles as a package but rather as individual items. For this to work efficiently, you will want to create an assembled/kit SKU. By doing this you can order the kit through a purchase order, and then upon receiving the assembled item, you will break it apart. This breakout of the kit will cause the QOH received from the purchase order to be added to the individual SKUs which are associated.
Useful link: Purchase Ordering with Assembled/Kit SKU
Receiving Purchase Orders
Receiving your inventory this way allows you to track your inventory, vendor invoices and inventory quantities which minimises the possibilities of errors and manipulation. Receiving inventory via Purchase Orders is fairly simple.
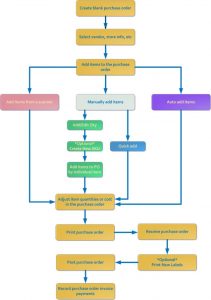
- STEP ONE – Create your Purchase Order
The first step to a successful purchase order is to create a new blank purchase order.Useful link: Creating Purchase Orders
- STEP TWO – Add Items to your Purchase Order
Once you have an empty order, you are ready to add the items you would like to order. There are several different methods to accomplish this:
Useful link: Manually Adding Items to a Purchase Order
Useful link: Exporting an SKU List from a Scanner to a Purchase Order
Useful link: Automatically Adding Items to a Purchase Order
Useful link: Adding Special Orders to a Purchase Order
- STEP THREE – Verify your Purchase Order
Look over your ordered items and make any changes or corrections needed:
Useful link: Adjusting Item Quantities in a Purchase Order
Useful link: Editing Purchase Order Items
Useful link: Applying discount or extra cost to list cost on Purchase Order
- STEP FOUR – Print your Purchase Order
When you are satisfied with your order, create a PO report to send to your vendor.
Useful link: Printing Purchase Orders
- STEP FIVE – Receive and post your Purchase Order
Once your ordered items arrive at your store, re-open the purchase order to receive and post the items.
Useful link: Receiving and Posting Purchase Orders
Useful link: Receiving and Posting Purchase Orders via Item Quantity Only
- STEP SIX – Record payment for your Purchase Order
Once you have an empty order, you are ready to add the items you would like to order. There are several different methods to accomplish this:
Useful link: Recording Purchase Order Invoice
Useful link: Recording PO Invoice Payments
Set Reorder Thresholds
WooPOS lets you set Minimum, Maximum, and Re-Order threshold points for your SKUs. For example, when you set a re-order threshold, WooPOS will automatically add that SKUs to your purchase order from the vendor designated for that SKU in that purchase order each time inventory levels reach the threshold point.
Useful Link: Setting Up Re-Order Quantities
Inventory Pricing & Costing
Pricing Products Manually
The simplest and easiest way to set up pricing in WooPOS is through the SKU page (inventory > Skus tab > Info Tab), from here you can add a product’s regular selling price, minimum price, and special price or sale price.
Useful link: Creating a New SKU
Automated Pricing by Markup
In order to set up automated pricing based on a suggested markup percentage, you need to create a special attribute called Suggested Markup. When you add the “Suggested Markup” attribute to an SKU, it will automatically add a markup as a percentage of the average landed cost of the SKU.
Useful link: Setting Up Pricing by Markup
Automated Pricing by Margin
In order to set up pricing based on a suggested margin percentage, you need to create a special attribute called Suggested Margin. When you add the “Suggested Margin” attribute to an SKU, it will automatically add a margin as a percentage of the average landed cost of the SKU.
Useful link: Setting Up Pricing by Margin
Automated Pricing by Customer Type
In order to set up pricing based on the specified customer’s type, you need to create a special decimal attribute called *Customer Type Name*_Price.
Tip: Replace *Customer Type Name* with the name of the customer type that should be affected by the rule. For example Employee_Price, Wholesale Customer_Price, VIP Customer_Price
Useful link: Pricing by Customer Type
Automated Pricing by Tier (Quantity or Customer Type)
Price tiering is a way of encouraging shoppers to buy larger quantities of a product by applying discounts based on the quantity ordered. These discounts may be “tiered” so that they increase as the order amount is raised. In WooPOS you can have different types of tiers based on advanced pricing rules that include, quantity, customer type and or order value.
Useful Link: Setting up Tier Pricing By Quantity and Customer Type
Automated Pricing using Advanced Rules
Advanced pricing rules allow you to automate promotional pricing in WooPOS. With advanced pricing rules, you can set up queries with triggers that automate promotional pricing when certain conditions are met, for example, buy one get one free promotion. WooPOS allows an unlimited number of pricing rules.
Useful Link: Advanced Special Price Rule
Minimum Pricing
Setting up a minimum price for an SKU prevents the SKU from being sold below that specified price. This minimum price overrides any sales or discount rules applied to the SKU making sure that whatever other rules apply to that SKU is set above the minimum price.
Tip: You can use advanced pricing rules to set minimum pricing for multiple products or while using custom conditions.
Inventory Adjustments
Sometimes, you need to reduce the amount of inventory you have without making a sale. This may be for
- Breakage – inventory that you have damaged and cannot sell
- Wastage – inventory that is out of date, or needs to be thrown away
- Write-offs – inventory loss due to other reasons such as theft
- Consumption of own inventory – inventory that you use or consume in the course of your business that you are not directly selling to a customer, but that you need to account for in your inventory.
Labels & Barcodes
Design Price Labels And Barcodes
In WooPOS you can create your own fully-customized barcode labels and price stickers without the need for third-party software. Whenever you receive inventory via a Purchase Order WooPOS can print all the required price labels for the received inventory using your custom design in the quantities that the labels are required.
Useful Link: Creating and Designing Custom Barcode Labels
Inventory Count (Stock Take)
An inventory count or stock take is a physical verification of the quantity and condition of items in stock and is a tool in inventory management. This is usually done to verify that the technical bookkeeping stock matches the physical inventory. This is often the source information needed to correct inventory errors. There are various methods of inventory counting available for inventory management. Some companies choose to count their inventory at specific times of the year, while others choose to do so (periodic counts). A year-end inventory census is often used to report a company’s year-end data. External auditors may also be present at the annual count to check the correctness of the counts. Inventory monitoring can help identify stock problems and shows businesses where potential problems are to be expected. Running an effective business begins, in any case, with effectively maintaining stock. WooPOS’s powerful inventory control system is designed to provide you with accurate information on all aspects of inventory to ensure that you have the software tools needed to manage and control your inventory in the most cost-effective manner possible.
1. Preparing For Your Inventory Count
- Read through the entire inventory count guide before starting your count.
- Prepare all physical inventory for count (organize items, reprint missing or damaged barcode tags, setup store sections for inventory batches).
- It is recommended that you make sure all physical inventory is transferred in as well as received and posted. Make sure all items in stock are part of the count.
- Ensure that the inventory scanners are fully charged, all cables are hooked up, and that Active Synch software is loaded on your terminals.
- Prepare your layaways and cancel ones that are not going to be picked up, if you plan to include layaways in your count. Print a list of your outstanding layaways, to ensure that you have the items (Generating a List of Outstanding Layaways).
- If your store is open during inventory counting, please note the following link: Selling Items During Inventory Count
- Set up portable inventory scanners. (Inventory Count Scanner Guides)
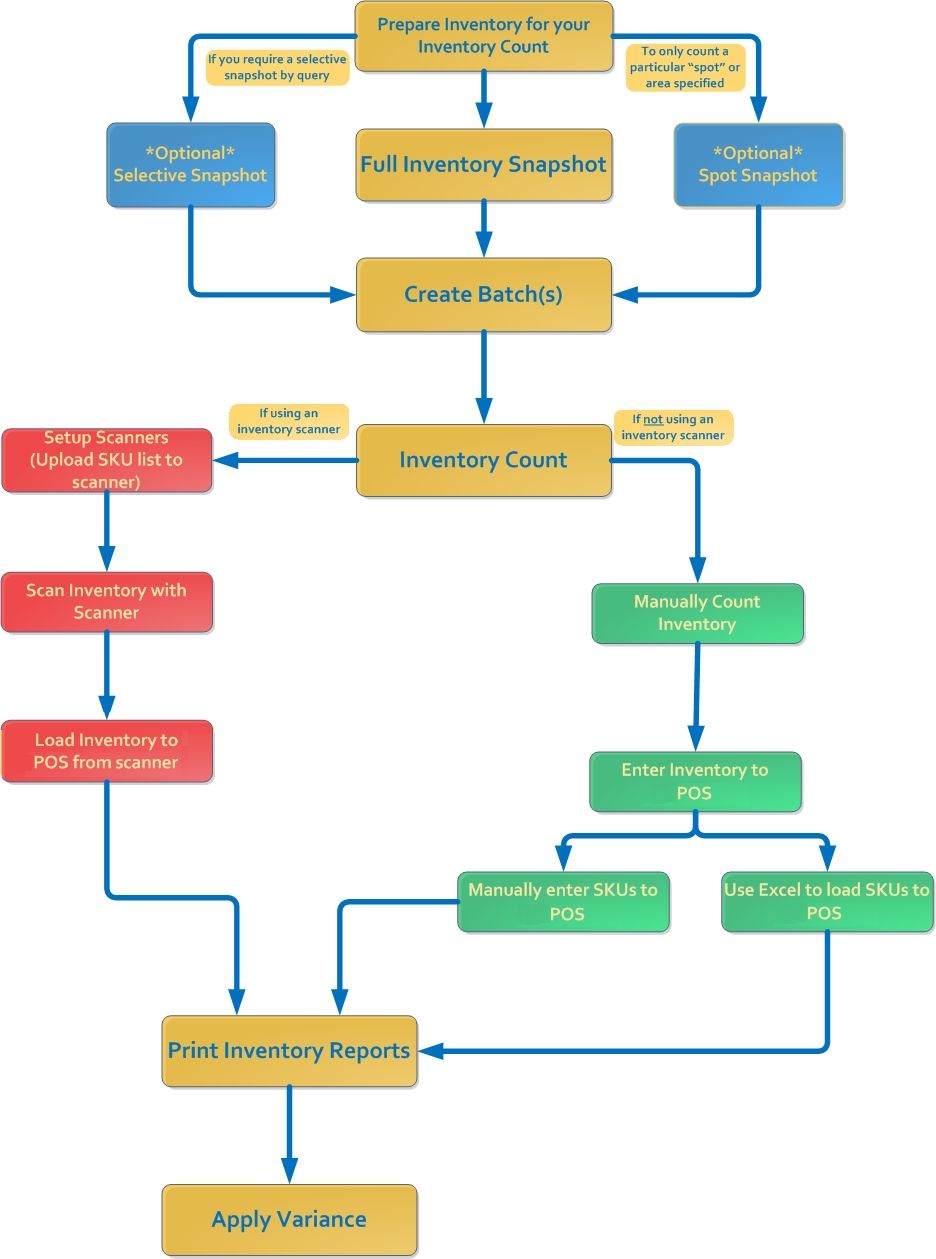
2. Setting Up POS for Count
- Generate a Snapshot: Generating Inventory Snapshots
- Create Batches: Creating Batches
- Upload SKU List to Scanner: Uploading SKU List to an Inventory Scanner
3. Counting Your Inventory
- Unplug the scanner from the USB and begin counting of the first batch. Each person counting a batch area should do one batch and then upload the count info for that batch before going on to the next one.
- Scan your inventory
- Load all inventory counts into POS using any of the following methods:
Useful link: Manually Entering SKUs to an Inventory Count
Useful link: Loading Count List from a Scanner
4. Viewing and Correcting Counted Inventory
- Review counted inventory and locate any discrepancies
Useful link: Locating Inventory Discrepancies
- Make any corrections and changes needed
Useful link: Removing an Incorrect SKU from a Batch
Useful link: Adjusting Counted Inventory
Useful link: Selling Items During Inventory Count
- Once you have accounted for all variances in your count, it may be useful to print out an inventory variance report for your records, as well as to help make any further adjustments.
5. Applying Variance
- Once all reports are done, the final step is to apply the final count totals to your inventory.
Useful link: Applying Variance
In short, you need to create a snapshot, create a batch, load the count data and apply the variance. You can also manually update inventory (see here).
Reversing Inventory Count or Adjustment
If you have done an inventory count or inventory adjustments by mistake, you can reverse back.
Useful link: Reversing Inventory Count or Adjustment